aka scorpion mount. Neat!
http://goprobackpackmount.blogspot.co.il/
Showing posts with label diy. Show all posts
Showing posts with label diy. Show all posts
Friday, November 2, 2012

Wednesday, November 2, 2011
DIY - Infinity bar pimpin'
Also known as the thrust-bearing mod. The following video from 10 seconds on shows the goal of what we want to achieve ...
Stock bar uses a big brass washer (BBW) and then a jam nut on a nyloc nut to hold it all together. The problem with this is that it doesn't rotate very freely so although the bar is cleverly designed so that, after a rotation, you untwist the flying lines by spinning the bar then untwist the double depower rope when you sheet in. Unfortunately, the tension on the BBW et al is such that the depower rope gets chewed up - if you use it in the appropriate method. You can untwist by hand but that sucks.
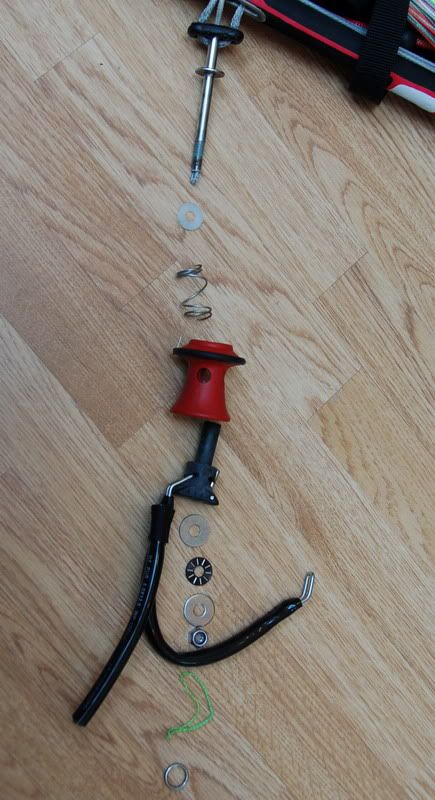
Here's an exploded view of Holden's needle bearing mod. It shows the setup nicely. The CL is connected to the black thing, the red hat and spring go onto the T-tube that has the double depower line looped around it.
Melting candle wax into the line (more on that at a later date, perhaps) helps keep it slippery; grease or other gunk down there is an option too but washes away and perversely attracts gunk and grit. IMHO the best option is simply to make the bar spin more freely.
Various teflon washer, ceramic or needle-bearings have been suggested but the greatest results have been obtained from using thrust bearings such as the MTBS-816 from here http://torquetrans.com/thrust-bearings/ss-metric-thrust-bearings.mgi ... be aware that they ONLY use UPS and shipping 1lbs (454g) of 8 sets to Japan was going to cost me $85 :D For $12, I got them to ship to a buddy in the US (thanks stetson!) and he sent them here ... for $2.59.
The problem - kinda - comes in putting it all together ... I went a bit mad with my digital calipers trying to work it all out.
Originally, the BBW + jam nut + nyloc nut = very close to 15mm. Breaking it down, the BBW is 0.75mm, jam nut is 6mm and the nyloc nut is 7.5mm.
The thrust-bearing stack (washer-bearing-washer) is 5mm tall. If you try to use the original stainless steel nyloc nut, you have to find a 1.5mm jam nut! Obviously no good.
You can't ditch the BBW cos it covers the pin that holds in the CL. And it's an odd diameter, something like 23mm so if you wish to drop a washer from the bearing stack and use a big stainless washer, then you - or rather, I - have to grind down a big stainless steel washer (BSSW) of 25mm diameter and bore a hole in the middle for the M8 thread of the bar doohickey. I wrecked a drill bit and over-heated and warped the washer I was experimenting on ... oops. So that bit is possible, at any rate. That leaves you with having to find only a 4mm jam nut ... get busy with a vise and file!
Solution 1 : grind and drill your own BSSW, use bearing-washer, file down a stainless nut to 4mm and use the OEM nyloc nut.
Less demanding of elbow grease is the option I tested the other day ... I bought the only little bag of nyloc nuts I could find in hardware stores in Japan and simply bolted it onto the stack above the BBW. The nyloc nut though is not (or does not look like) stainless steel, maybe zinc coated or something. It's also taller than the OEM nyloc nut at 9mm and the lip at the top where the nylon ring is, is taller than the OEM nyloc nut - if you wanted to file this down, you'd end up with a very slim hex part.
Solution 2 : keep the BBW, use the full thrust-bearing stack, add the M8 non-stainless nyloc nut ... and some thread-locking compound.
Those are the two options that most appeal to me - you could also use 2 short M8 stainless nuts or file them down a bit ...
Solution 3 : BSSW, 2/3 thrust-bearing stack, 2x filed down M8 nuts.
I'm of the opinion that so long as the thrust-bearing is doing its job and spinning freely the torque on the solitary nyloc nut is minimal and easily secures the rig ... and some thread-lock for paranoia! So I'm of the opinion that for ease of install and use, Solution 2 is the best option. Only time will tell if the components hold up to the water and work-out ...
Also, I prefer a nyloc nut on the end of the stack because, as you can almost make out in the pictures below, tightening the T-tube doohickey so the end of the thread stays in the nylon ring should stop it eating up the FLS line. One other thing to note too is at the other end of the CL and QR gubbins ... with the original setup, there's a bit of slack in there - the black CL holder has free-play on the T-tube. I think this is necessary because the welds on the stopper for the spring stand proud, and if it was all tightened up snug the black CL holder couldn't spin freely. It's also handy because it'll let the holder move around and should enable grit to be washed out of the bearing stack.
Someone put a thrust bearing at the end of the black tube but that's totally necessary I reckon as when the CL is under load, it's pulling the CL holder down and the kite is pulling the T-tube up - the only stress will be ... exactly where the thrust bearing is!
Here are the pics of what I've got. Crappy cell phone cos I can't find memory cards/chargers/batteries for the cameras at home that can do a proper macro.


After all that I bet you want to know how it all works? Well, it's bloody sweet! Spins perfectly, very smooth. Easy to untwist lines - too easy in fact! My first few uses, the bar spun so easily that my reactions hadn't accounted for the smoothness and I'd grabbed the bar backwards ... PLOP drove the kite into the water!
What pretty much happens is that the depower line simply untwists itself when you spin the bar to untwist the lines. An added bonus is that the bits rotate with the bar, so the CL stays square on your harness while the bar moves around ... neato! Well worth all the hassle involved of getting the bits ...!
UPDATE : 10th of April, 2012
Should've gotten to this sooner...
When I got back from NZ (and using the 21 in the salt water) I had with me some stainless steel nyloc nuts. I got around to replacing the zinc ones finally...
Actually, that's not true at all. I bought some SS nylocs in NZ but couldn't find them. So I went to the excruciating process of ordering some here in Japan... When they arrived, they were taller again than the zinc ones (???) at about 12mm.
Eventually - after replacing all the zinc ones with the new Japan-bought SS nuts - I found the ones I bought in NZ... in a ziploc bag of camera chargers and cables :-/ Murphy, you bugger.
So again, I replaced all the Japan-SS nuts with the NZ-SS nuts - which were shorter than all the other ones :o more like the original FSer ones.
Le sigh.
So the big news was that the zinc nut corroded like crap in the salt water. It looked furry and nasty and left a rust stain on the SS washer and green gunk on the brass one. The rust and gunk all wiped off easily though and the bearing itself was still super-sweet!
Despite having only one nut, it hasn't shifted at all... and I don't expect it to - so long as the bearing spins :)
Stock bar uses a big brass washer (BBW) and then a jam nut on a nyloc nut to hold it all together. The problem with this is that it doesn't rotate very freely so although the bar is cleverly designed so that, after a rotation, you untwist the flying lines by spinning the bar then untwist the double depower rope when you sheet in. Unfortunately, the tension on the BBW et al is such that the depower rope gets chewed up - if you use it in the appropriate method. You can untwist by hand but that sucks.
Here's an exploded view of Holden's needle bearing mod. It shows the setup nicely. The CL is connected to the black thing, the red hat and spring go onto the T-tube that has the double depower line looped around it.
Melting candle wax into the line (more on that at a later date, perhaps) helps keep it slippery; grease or other gunk down there is an option too but washes away and perversely attracts gunk and grit. IMHO the best option is simply to make the bar spin more freely.
Various teflon washer, ceramic or needle-bearings have been suggested but the greatest results have been obtained from using thrust bearings such as the MTBS-816 from here http://torquetrans.com/thrust-bearings/ss-metric-thrust-bearings.mgi ... be aware that they ONLY use UPS and shipping 1lbs (454g) of 8 sets to Japan was going to cost me $85 :D For $12, I got them to ship to a buddy in the US (thanks stetson!) and he sent them here ... for $2.59.
The problem - kinda - comes in putting it all together ... I went a bit mad with my digital calipers trying to work it all out.
Originally, the BBW + jam nut + nyloc nut = very close to 15mm. Breaking it down, the BBW is 0.75mm, jam nut is 6mm and the nyloc nut is 7.5mm.
The thrust-bearing stack (washer-bearing-washer) is 5mm tall. If you try to use the original stainless steel nyloc nut, you have to find a 1.5mm jam nut! Obviously no good.
You can't ditch the BBW cos it covers the pin that holds in the CL. And it's an odd diameter, something like 23mm so if you wish to drop a washer from the bearing stack and use a big stainless washer, then you - or rather, I - have to grind down a big stainless steel washer (BSSW) of 25mm diameter and bore a hole in the middle for the M8 thread of the bar doohickey. I wrecked a drill bit and over-heated and warped the washer I was experimenting on ... oops. So that bit is possible, at any rate. That leaves you with having to find only a 4mm jam nut ... get busy with a vise and file!
Solution 1 : grind and drill your own BSSW, use bearing-washer, file down a stainless nut to 4mm and use the OEM nyloc nut.
Less demanding of elbow grease is the option I tested the other day ... I bought the only little bag of nyloc nuts I could find in hardware stores in Japan and simply bolted it onto the stack above the BBW. The nyloc nut though is not (or does not look like) stainless steel, maybe zinc coated or something. It's also taller than the OEM nyloc nut at 9mm and the lip at the top where the nylon ring is, is taller than the OEM nyloc nut - if you wanted to file this down, you'd end up with a very slim hex part.
Solution 2 : keep the BBW, use the full thrust-bearing stack, add the M8 non-stainless nyloc nut ... and some thread-locking compound.
Those are the two options that most appeal to me - you could also use 2 short M8 stainless nuts or file them down a bit ...
Solution 3 : BSSW, 2/3 thrust-bearing stack, 2x filed down M8 nuts.
I'm of the opinion that so long as the thrust-bearing is doing its job and spinning freely the torque on the solitary nyloc nut is minimal and easily secures the rig ... and some thread-lock for paranoia! So I'm of the opinion that for ease of install and use, Solution 2 is the best option. Only time will tell if the components hold up to the water and work-out ...
Also, I prefer a nyloc nut on the end of the stack because, as you can almost make out in the pictures below, tightening the T-tube doohickey so the end of the thread stays in the nylon ring should stop it eating up the FLS line. One other thing to note too is at the other end of the CL and QR gubbins ... with the original setup, there's a bit of slack in there - the black CL holder has free-play on the T-tube. I think this is necessary because the welds on the stopper for the spring stand proud, and if it was all tightened up snug the black CL holder couldn't spin freely. It's also handy because it'll let the holder move around and should enable grit to be washed out of the bearing stack.
Someone put a thrust bearing at the end of the black tube but that's totally necessary I reckon as when the CL is under load, it's pulling the CL holder down and the kite is pulling the T-tube up - the only stress will be ... exactly where the thrust bearing is!
Here are the pics of what I've got. Crappy cell phone cos I can't find memory cards/chargers/batteries for the cameras at home that can do a proper macro.
After all that I bet you want to know how it all works? Well, it's bloody sweet! Spins perfectly, very smooth. Easy to untwist lines - too easy in fact! My first few uses, the bar spun so easily that my reactions hadn't accounted for the smoothness and I'd grabbed the bar backwards ... PLOP drove the kite into the water!
What pretty much happens is that the depower line simply untwists itself when you spin the bar to untwist the lines. An added bonus is that the bits rotate with the bar, so the CL stays square on your harness while the bar moves around ... neato! Well worth all the hassle involved of getting the bits ...!
UPDATE : 10th of April, 2012
Should've gotten to this sooner...
When I got back from NZ (and using the 21 in the salt water) I had with me some stainless steel nyloc nuts. I got around to replacing the zinc ones finally...
Actually, that's not true at all. I bought some SS nylocs in NZ but couldn't find them. So I went to the excruciating process of ordering some here in Japan... When they arrived, they were taller again than the zinc ones (???) at about 12mm.
Eventually - after replacing all the zinc ones with the new Japan-bought SS nuts - I found the ones I bought in NZ... in a ziploc bag of camera chargers and cables :-/ Murphy, you bugger.
So again, I replaced all the Japan-SS nuts with the NZ-SS nuts - which were shorter than all the other ones :o more like the original FSer ones.
Le sigh.
So the big news was that the zinc nut corroded like crap in the salt water. It looked furry and nasty and left a rust stain on the SS washer and green gunk on the brass one. The rust and gunk all wiped off easily though and the bearing itself was still super-sweet!
Despite having only one nut, it hasn't shifted at all... and I don't expect it to - so long as the bearing spins :)
Monday, August 15, 2011
DIY - this time, QR and CL
Thought I could add the Switch QR/CL to the PL Navigator bars ... a mixed bag of results. Here's why ...
• The QR/CL uses the same double depower rope and safety through the center - that all works fine, plugs'n'plays no worries.
• The PL CL has a larger diameter hole (7 or 8mm versus 5mm) through the body to cope with the heat-shrink that covers the line where the thicker safety joins the thinner safety - that gets stuck at the hole to the Switch QR body. I cut the heat-shrink off and it glides through fine ... the stitching could probably be improved with some whipping if necessary. I tried to drill the hole out - I got it out to 5.5mm but then my drill bits were melting and the tube was deforming :o
• Solution to the hole problem : drill it out (meh) or replace the entire safety line with the 3mm Amsteel. Which makes me wonder why they didn't do that in the first place ...? The only issue I see of NOT drilling it out, is if you go for a shortened V setup - it may not get through easy :(
http://switchkites.com/warehouse_comp/product_info.php?cPath=28&products_id=67
Oh I've just noticed that they've dropped the Complete QR from their parts page ... so basically, all this is moot. Sucky.
EDIT : back up. Great!
I'll try the whole thing out on a light wind day, anyway. So there you have it. And here are the pics ...
• Solution to the hole problem : drill it out (meh) or replace the entire safety line with the 3mm Amsteel. Which makes me wonder why they didn't do that in the first place ...? The only issue I see of NOT drilling it out, is if you go for a shortened V setup - it may not get through easy :(
http://switchkites.com/warehouse_comp/product_info.php?cPath=28&products_id=67
Oh I've just noticed that they've dropped the Complete QR from their parts page ... so basically, all this is moot. Sucky.
EDIT : back up. Great!
I'll try the whole thing out on a light wind day, anyway. So there you have it. And here are the pics ...
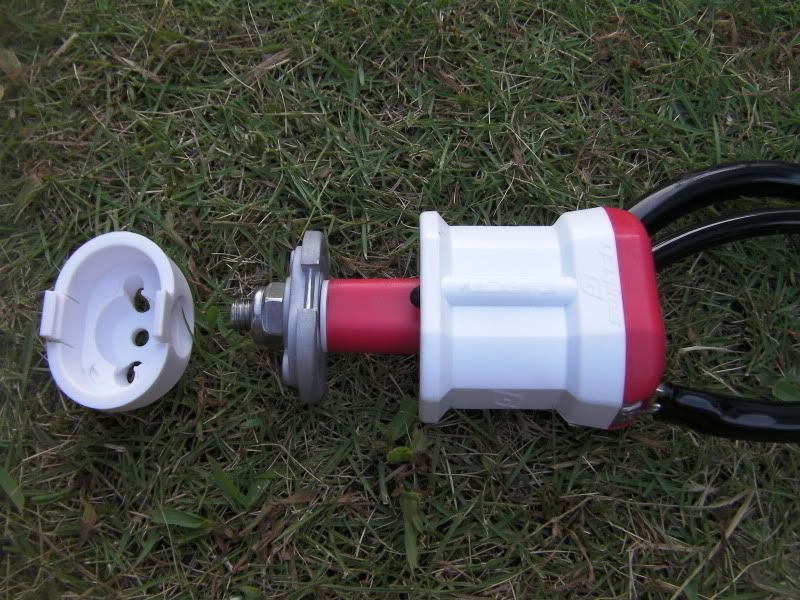
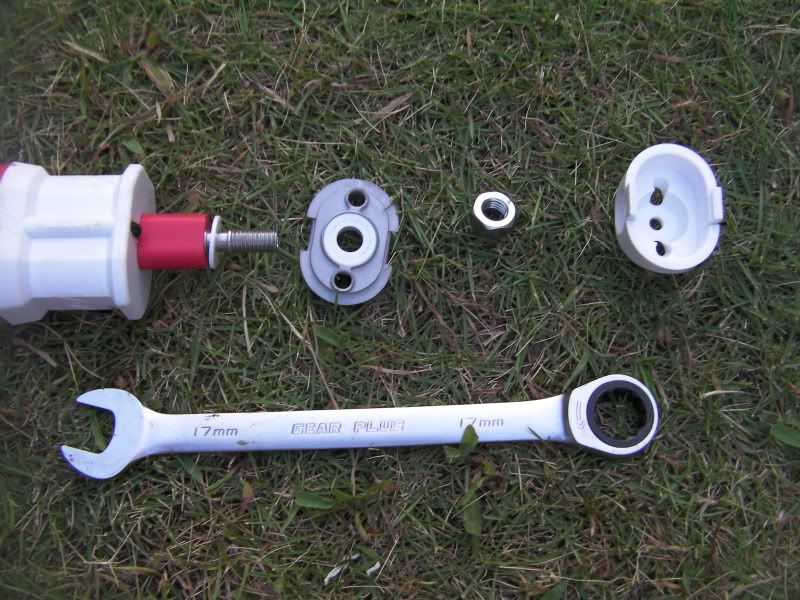
Switch QR/CL
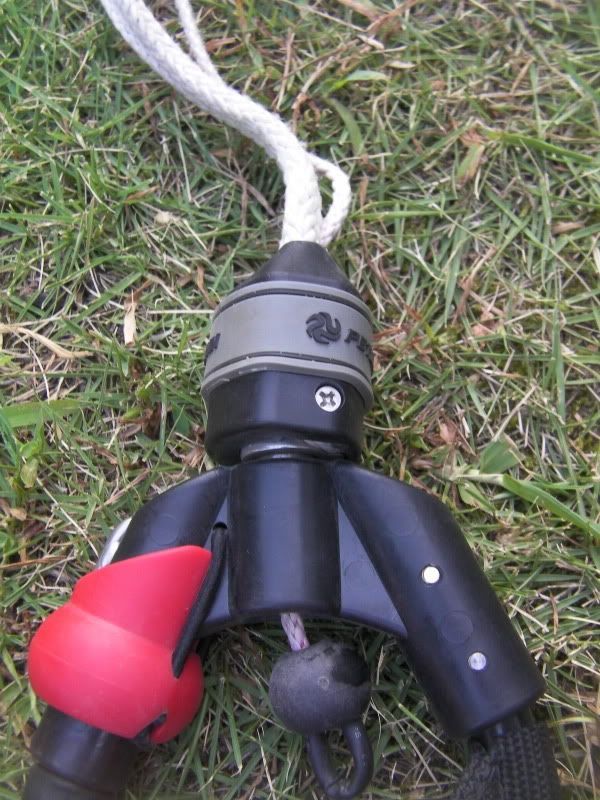
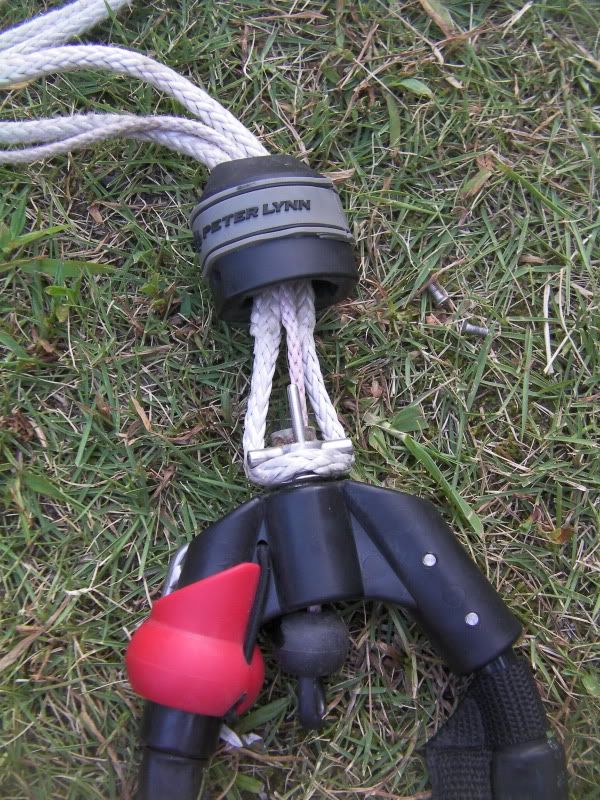
Peter Lynn Navigator QR/CL

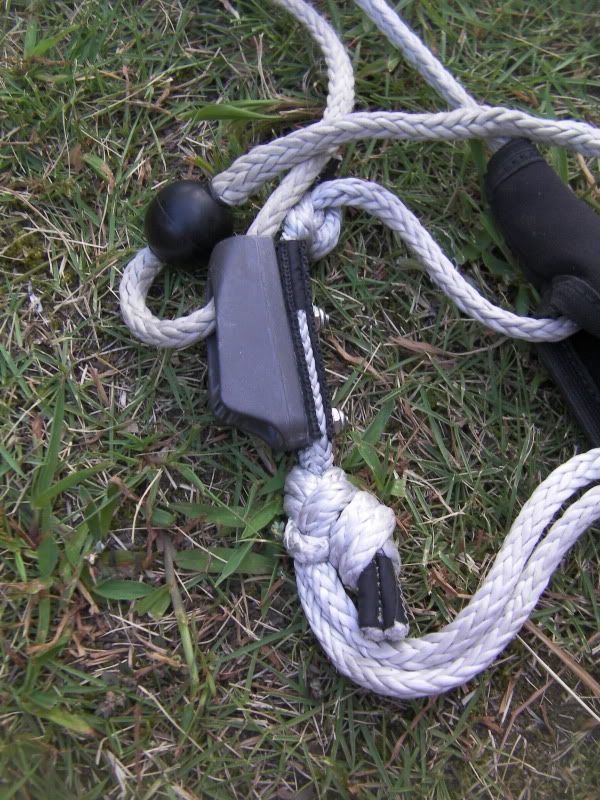
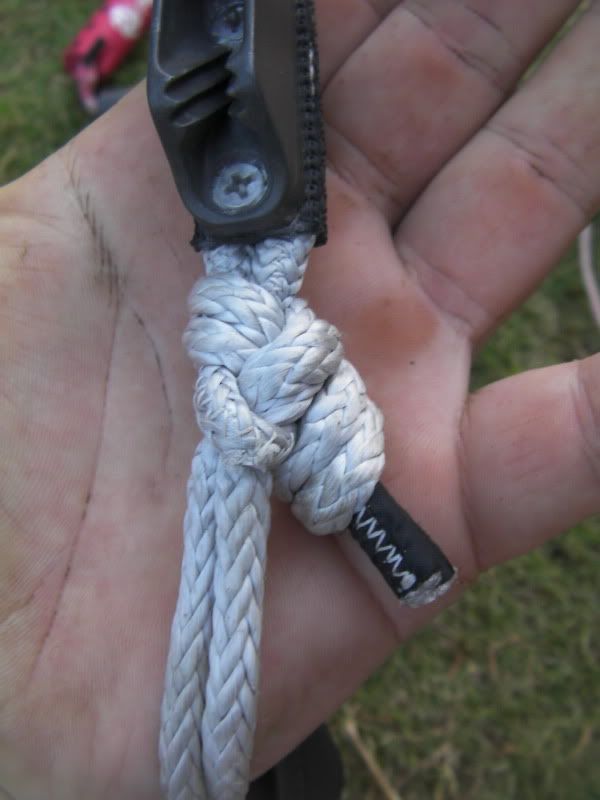
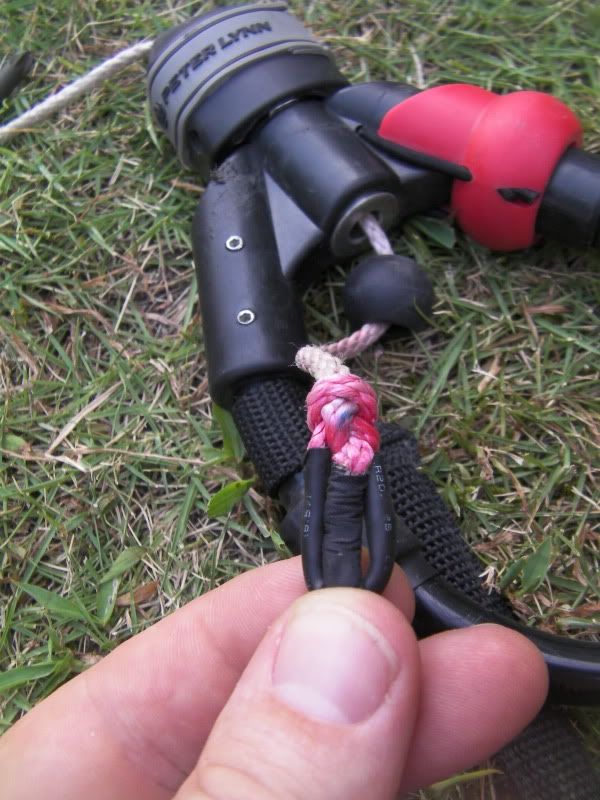
The tricky bits ... pull the cam cleat out of the sock, note that the depower line is finished with a square-knot and sheep-shanked to the cleat and that the stopper ball is knotted with a bow-line. Easy o_0
Then undo the square-knot and feed it all out.
Then undo the square-knot and feed it all out.
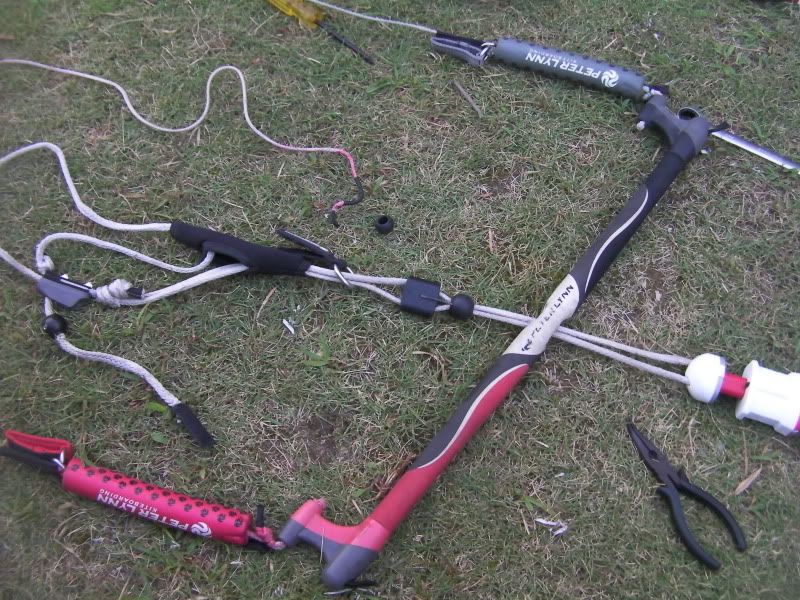
Loop the depower line around the swivel in the Switch QR/CL then reassemble. Note the order. And note that the stopping slider block in default configuration has the holes closer together at the bar end ... make sure to get the square-knot and sheep-shank tight and compact.
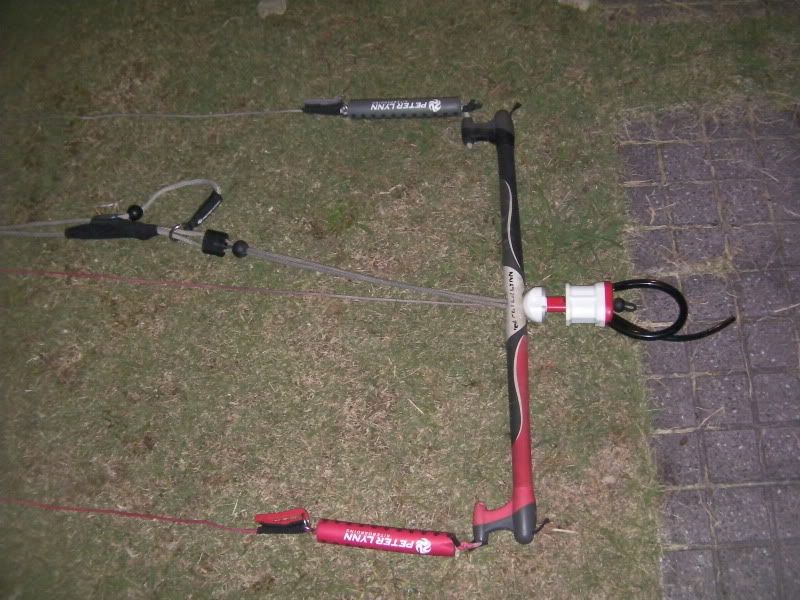
Finished!
UPDATE
After a bout of paranoia, I went back to the PL chicken loop - the hole through the Switch QR just wasn't big enough and required removal of the heat shrink covering the stitched loops of the safety line to fit through. Which got me worried about wear on the ends ... I should probably find a way to nicely splice them into each other.
In the interim, I've decided that I need to either drill the hole out PROPERLY with a drill press and some lube before I attempt it again.
Also, I've realized that the somewhat bulky and messy (IMHO) cam cleat could be replaced with the Switch "Regulator" and offer adjustable depower throw and trim range :D
... a project for the coming winter ;)
Tuesday, February 15, 2011
Notes to self on DIY of the Megatron chicken loop for Flysurfer bars
With pictures and more or less information.
Update - ordered some Samson LashIt! twine from the US ... made from Dyneema and UV coated, 180 feet for $25 plus the same for shipping 0_o 1.75mm and 500lbs (230kg) breaking load - just what the doctor ordered! Hopefully :D and there should be much less grunting and swearing involved ...
Update on the update - LashIt! has arrived and looks excellent - adds very little to the thickness of the 5mm and oddly enough, looks exactly like what is used in the Flysurfer depower line ... will get into making a line tonight and promise to take pictures!
Supplies
• About 150cm of 5mm (3/16) Amsteel Blue SK-75, breaking load 2,500kg for the depower loop line
• and 100cm of 2.8 of Amsteel Blue SK-75, breaking load 750kg for the "core" ... probably the 2.2mm LashIt! would have been better than the 1.75mm but cest la vie and all that.
• 5/8mm ID/OD PU tubing - goes under the spinning handle and is easier than reusing the Ozone stuff ... it's just compressor line anyway
• Ozone Megatron chicken loop (duh) with the "Spinning Handle" for the 5th line safety
• Heat-shrink (or whipping line - synthetic)
• Needles and thread (synthetic too)
Tools
• Long-nosed pliers
• DIY pull fid - made from coated 20-gauge wire, put the end you want a loop in, in a drill and spun slowly till at least 1m long
• tie ball to push the tubing, about 20mm
0. Skip all this crap and use the Beal line. The easiest option by a country mile, but 1,200kg breaking load bothers me ...
1. Cut the PU tubing to fit inside the "Spinning Handle" - about 6cm long.
2. Taper the end of the 5mm Amsteel ...
• measure and mark at 70mm, 90mm and 110mm
• pull out 2 braids at each mark, starting at 110mm and working towards the tip
• should leave about 3-4 lines at the tip - if there's more, pull out a few more between the marks - keep the taper smooth!


3. Splice the 'core' into the 5mm Amsteel with the wire fid. Leave some sticking out on either end so you can pull it tight.


4. Start the lock stitch about 5mm from where you plan to cut. Slide the heat-shrink over the 5mm. Stitch out away from where you'll cut, then when you turn around to stitch back, cut and heat-shrink it then stitch back to the end and over the heat shrink.
5. Figure-8 knot in that end - that'll be going inside the CL body.


6. Remove the suicide-leash loop. Feed the tapered end of the 5mm up into the body of the CL, orientated so that the knot will be inside. Pull the 5mm though, smoothing it over the core. Pull hard to seat the Figure-8 stopper knot.
7. Feed the tapered end of the 5mm into the PU tube - twist and push!


8. If all goes well, the gods are smiling, the planets align and you hold your tongue just right - you should be able to pull out the 5mm and slide the PU over the taper, down the line and over the part with the core. From here on, use the ball-thingy to push the PU tube down to the CL body. Smooth out the 5mm over the core and seat it hard against the body of the CL.
9. Fit the spinning handle onto the PU tubing ... using a smaller core makes life easier - zero strain with the 1.75mm LashIt!. Leave the screws just snugged-up for now.
10. Make sure the 5mm is smooth and taught over the core; measure 40cm from the spinning handle body (40cm is standard for FS kites - J. suggests 40-45cm; my SA2.5 is 48cm) and then figure out how much you need for a Bowline ...
11. Cut the line off square and secure the tip with heat-shrink or whipping - and lock stitch ... I had planned to cut 1.1m of 5mm and end up with 1m of depower line but somehow it ended up as a finished length of 70cm which is about perfect - you can easily (kinda!) tie a bowline at the trim strap and still have 45cm of depower. That's before it's put under load and tightens up ...


12. Feed the depower line through the bar, fit the gust absorber and feed/pull through the trim strap - make sure there's some 8mm OD PU tubing in there!
13. Bowline at the trim strap. Get it tight! It'll all snug up on the next flight, so be prepared to adjust front leader lines or mixer 0_o'
14. Tidy it all up; refit the suicide-leash loop, tighten the screws on the spinning handle (make sure it and the PU tubing is seated hard against the CL body), cover the gust absorber.

15. Go fly! Check to stretch etc and SailKote the line!
Update - ordered some Samson LashIt! twine from the US ... made from Dyneema and UV coated, 180 feet for $25 plus the same for shipping 0_o 1.75mm and 500lbs (230kg) breaking load - just what the doctor ordered! Hopefully :D and there should be much less grunting and swearing involved ...
Update on the update - LashIt! has arrived and looks excellent - adds very little to the thickness of the 5mm and oddly enough, looks exactly like what is used in the Flysurfer depower line ... will get into making a line tonight and promise to take pictures!
Supplies
• About 150cm of 5mm (3/16) Amsteel Blue SK-75, breaking load 2,500kg for the depower loop line
• and 100cm of 2.8 of Amsteel Blue SK-75, breaking load 750kg for the "core" ... probably the 2.2mm LashIt! would have been better than the 1.75mm but cest la vie and all that.
• 5/8mm ID/OD PU tubing - goes under the spinning handle and is easier than reusing the Ozone stuff ... it's just compressor line anyway
• Ozone Megatron chicken loop (duh) with the "Spinning Handle" for the 5th line safety
• Heat-shrink (or whipping line - synthetic)
• Needles and thread (synthetic too)
Tools
• Long-nosed pliers
• DIY pull fid - made from coated 20-gauge wire, put the end you want a loop in, in a drill and spun slowly till at least 1m long
• tie ball to push the tubing, about 20mm
0. Skip all this crap and use the Beal line. The easiest option by a country mile, but 1,200kg breaking load bothers me ...
1. Cut the PU tubing to fit inside the "Spinning Handle" - about 6cm long.
2. Taper the end of the 5mm Amsteel ...
• measure and mark at 70mm, 90mm and 110mm
• pull out 2 braids at each mark, starting at 110mm and working towards the tip
• should leave about 3-4 lines at the tip - if there's more, pull out a few more between the marks - keep the taper smooth!
3. Splice the 'core' into the 5mm Amsteel with the wire fid. Leave some sticking out on either end so you can pull it tight.
4. Start the lock stitch about 5mm from where you plan to cut. Slide the heat-shrink over the 5mm. Stitch out away from where you'll cut, then when you turn around to stitch back, cut and heat-shrink it then stitch back to the end and over the heat shrink.
5. Figure-8 knot in that end - that'll be going inside the CL body.
6. Remove the suicide-leash loop. Feed the tapered end of the 5mm up into the body of the CL, orientated so that the knot will be inside. Pull the 5mm though, smoothing it over the core. Pull hard to seat the Figure-8 stopper knot.
7. Feed the tapered end of the 5mm into the PU tube - twist and push!
8. If all goes well, the gods are smiling, the planets align and you hold your tongue just right - you should be able to pull out the 5mm and slide the PU over the taper, down the line and over the part with the core. From here on, use the ball-thingy to push the PU tube down to the CL body. Smooth out the 5mm over the core and seat it hard against the body of the CL.
9. Fit the spinning handle onto the PU tubing ... using a smaller core makes life easier - zero strain with the 1.75mm LashIt!. Leave the screws just snugged-up for now.
10. Make sure the 5mm is smooth and taught over the core; measure 40cm from the spinning handle body (40cm is standard for FS kites - J. suggests 40-45cm; my SA2.5 is 48cm) and then figure out how much you need for a Bowline ...
11. Cut the line off square and secure the tip with heat-shrink or whipping - and lock stitch ... I had planned to cut 1.1m of 5mm and end up with 1m of depower line but somehow it ended up as a finished length of 70cm which is about perfect - you can easily (kinda!) tie a bowline at the trim strap and still have 45cm of depower. That's before it's put under load and tightens up ...
12. Feed the depower line through the bar, fit the gust absorber and feed/pull through the trim strap - make sure there's some 8mm OD PU tubing in there!
13. Bowline at the trim strap. Get it tight! It'll all snug up on the next flight, so be prepared to adjust front leader lines or mixer 0_o'
14. Tidy it all up; refit the suicide-leash loop, tighten the screws on the spinning handle (make sure it and the PU tubing is seated hard against the CL body), cover the gust absorber.
15. Go fly! Check to stretch etc and SailKote the line!
Thursday, January 20, 2011
Testing, testing ...
Took the Synergy 19 down to the lake for a quick test flight after work - I'd put
Ronstan Orbit series 20 blocks (pulleys) on it a while back, but only now just got around to flying it.
Used the same method as on the Charger to attach the block - little pig tail through the block then "Lark's Head" onto the strap on the kite. I used 3.2mm Amsteel Blue (in red) and stitched and knotted the pig tail. I think I used about 140mm but I forget now ... anyway, it was a tight fit to get onto the kite, but now it's only about 5mm longer than the OE pulley. Although the Ronstan is larger diameter so it all balances out I guess ...
... anyway, the kite flew fine, the pulleys worked as they're supposed to and all the rigging looks bomb-proof. It may just be psychological, but I swear that the steering/sheeting response was smoother ... and crisper, if it's possible to be both at the same time!
Well, that's done - now to sell all my Synergy's to fund my upgrade to Chargers ... I don't suppose that you know anyone that wants an immaculate 8, 10, 12 or 15 and a barely used 19, do you? ;)
Edit : 15 is gone, 19 is going I think ... need to sell off the tiddlers. Got a line on a 19m Charger - woop woop! - so I can see what all the moaning is about ...
Ronstan Orbit series 20 blocks (pulleys) on it a while back, but only now just got around to flying it.
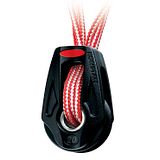
Used the same method as on the Charger to attach the block - little pig tail through the block then "Lark's Head" onto the strap on the kite. I used 3.2mm Amsteel Blue (in red) and stitched and knotted the pig tail. I think I used about 140mm but I forget now ... anyway, it was a tight fit to get onto the kite, but now it's only about 5mm longer than the OE pulley. Although the Ronstan is larger diameter so it all balances out I guess ...
... anyway, the kite flew fine, the pulleys worked as they're supposed to and all the rigging looks bomb-proof. It may just be psychological, but I swear that the steering/sheeting response was smoother ... and crisper, if it's possible to be both at the same time!
Well, that's done - now to sell all my Synergy's to fund my upgrade to Chargers ... I don't suppose that you know anyone that wants an immaculate 8, 10, 12 or 15 and a barely used 19, do you? ;)
Edit : 15 is gone, 19 is going I think ... need to sell off the tiddlers. Got a line on a 19m Charger - woop woop! - so I can see what all the moaning is about ...
Saturday, November 20, 2010
Night kiting
... by Feyd a.k.a Hardwater Kiter. Just in case he doesn't upload anything to his blog (har!) here's a pic of his night rig in a Charger.
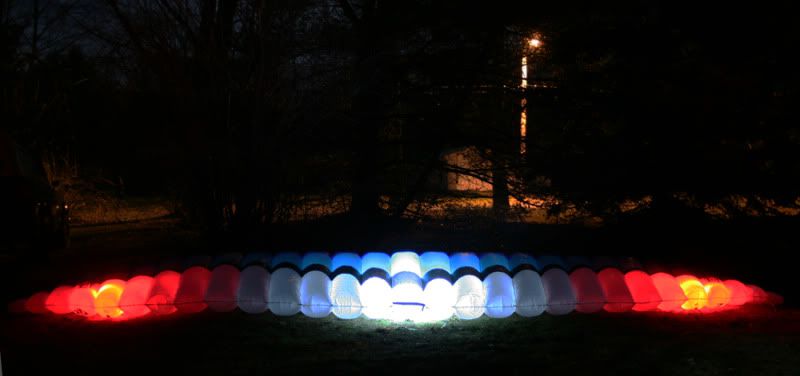
Quote from PKF ...
"Changed my lighting system. Put the Million in and Superflashes on tips.
I'm so gonna get arrested for causing a disturbance.
...
All lights together weigh less than a pound. Gonna have to call the authorities before I go out to give them a heads up :D"
The last, was a comment about how people have called the cops after seeing night-lighted kites and mistaking them for UFOs :/
If I can get more details or pics, I'll add them at a later date.
Quote from PKF ...
"Changed my lighting system. Put the Million in and Superflashes on tips.
I'm so gonna get arrested for causing a disturbance.
...
All lights together weigh less than a pound. Gonna have to call the authorities before I go out to give them a heads up :D"
The last, was a comment about how people have called the cops after seeing night-lighted kites and mistaking them for UFOs :/
If I can get more details or pics, I'll add them at a later date.
Thursday, August 26, 2010
Speed bar upgrade - done!
Ordered an Ozone Megatron chicken loop to replace the OE Flysurfer one that's getting very ratty. It finally arrived today so I installed it with some blue depower line ... should work nice :)
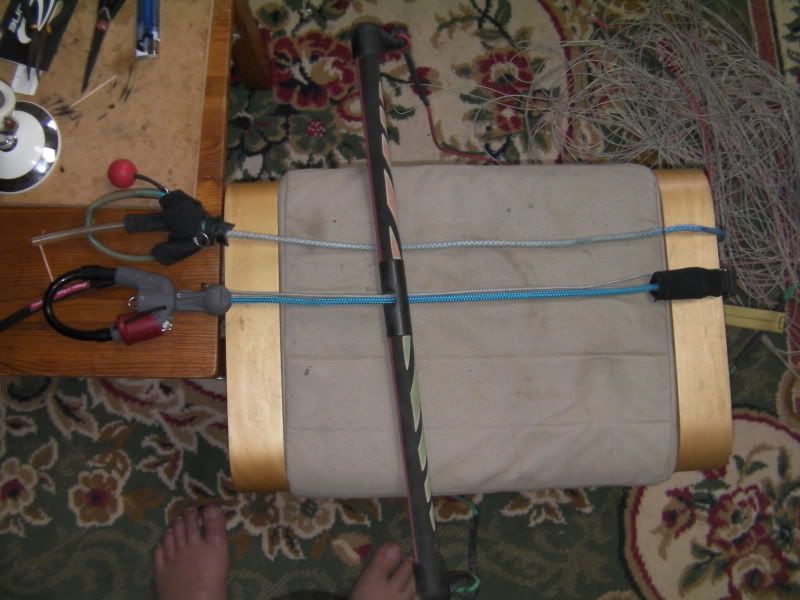
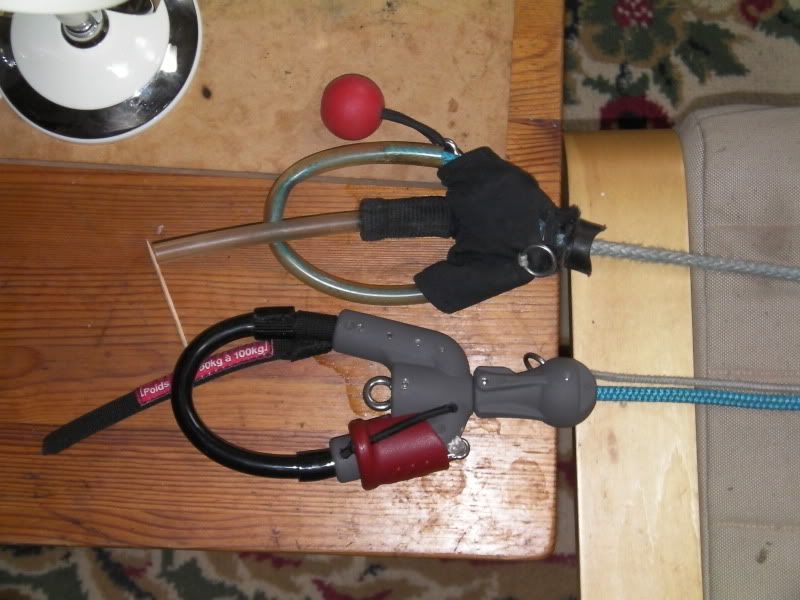
Wednesday, July 21, 2010
More DIY - splicing
I like makin' stuff ... I made the DIY crossover depower bar thingy and had great fun learning to splice stuff. I used to use a needle with a very dull tip and a large eye but it was often tough to pull through, being unable to grip the needle and all. Nick had an expensive splicing tool he bought overseas but unwilling to wait (or search for) one, I decided to make one. This is what I ended up with ...
It's basically a long needle with a large eye that I heated up with a blow-torch-in-a-can from the DIY store, a pair of pliers and my vice. Bent the needle around the ring, cut off the point - voila! Took about 10 minutes and works great!
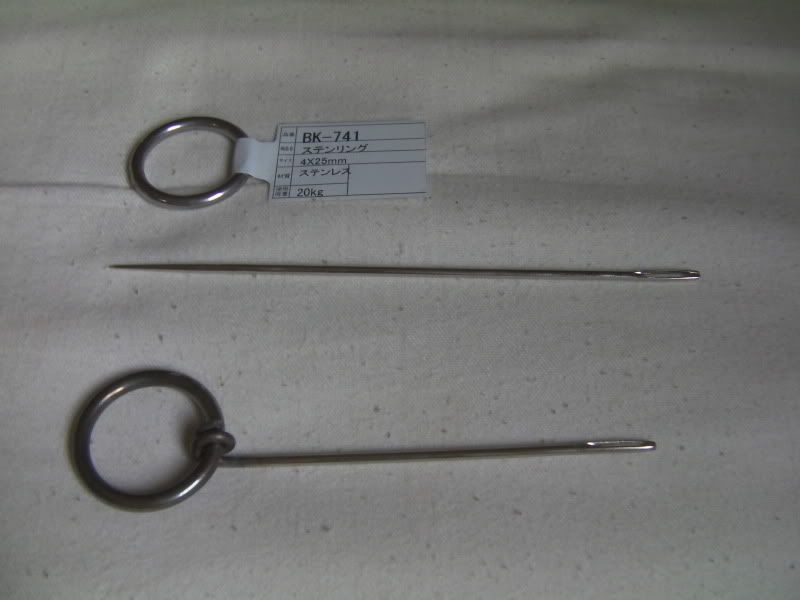
Splicing is too easy!
A simple splice can be locked down by stitching it with a sewing machine, looking all very professional, as you can see at the FS Splicing Manual

... or with slightly less machinery as suggested by these guys.

Then there's the Zacher knot; needs no stitching with pesky waterproof thread but is a bit ugly. Found on the Storm Riders page - now via edt :)

My suggestion for the perfect locking splice without sewing it is the Brummell which I discovered at New England Ropes website.


Tips I learnt along the way ...
Flatten the end you're going to thread through the tool a little then cut at a sharp angle - aim to cut off about 10mm. Be very careful not to allow it to unravel too much past that 10mm.
When finishing the splice, cut the bitter end off just like above, then pull it into the spliced line - if you cut it square, it doesn't taper off smoothly.
Pull slowly and work the tool gently with your fingers.
Be careful not to allow the tool to pop out - you may lose the end of your splice up in there. Annoyance turned up to 11.
Stitching, done by hand, is very tough to make look tight, clean and professional. Especially when the thread is a different colour to the spliced line.
New England Ropes has this version of the Lock Stitch, which is a simple Brummell but does NOT lock the line very well and looks ugly.
Don't use a half-hitch on the Zacher, as suggested on that page - it ends up bulkier than an overhand knot.
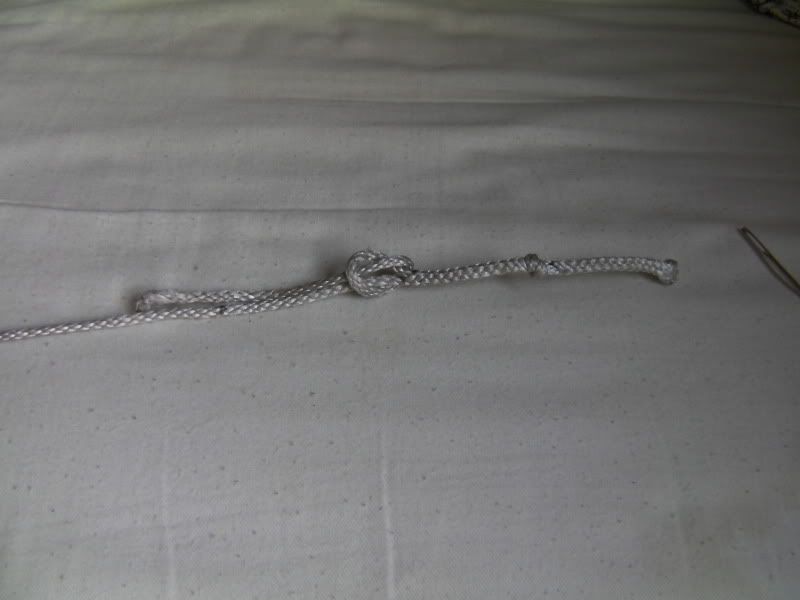
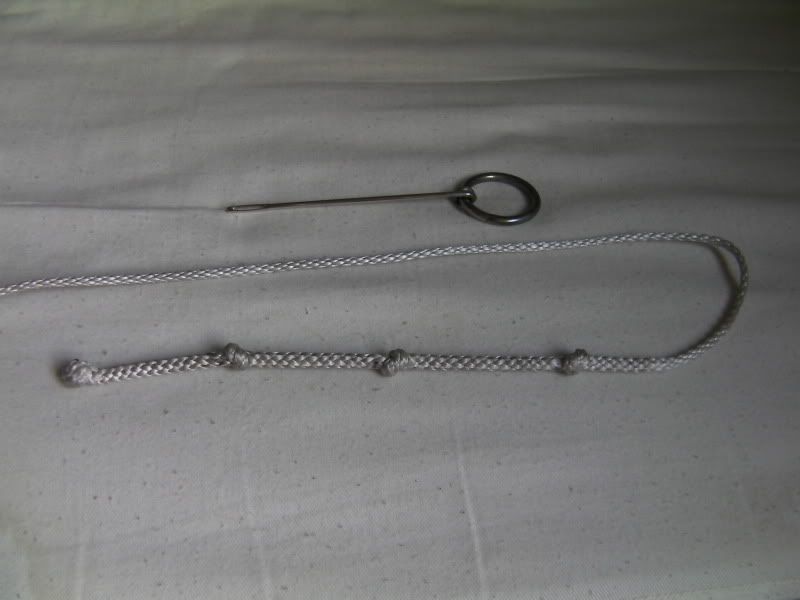
The trick with the Brummell is that you have to invert one of the loops, actually poke it back through the other way. IIRC it's knot B on the webpage diagrams; use the tool again to encourage it back through. You have to go through the line that goes through the other ... sounds very Mobius strip but look at figure 11 up there and this pic ...
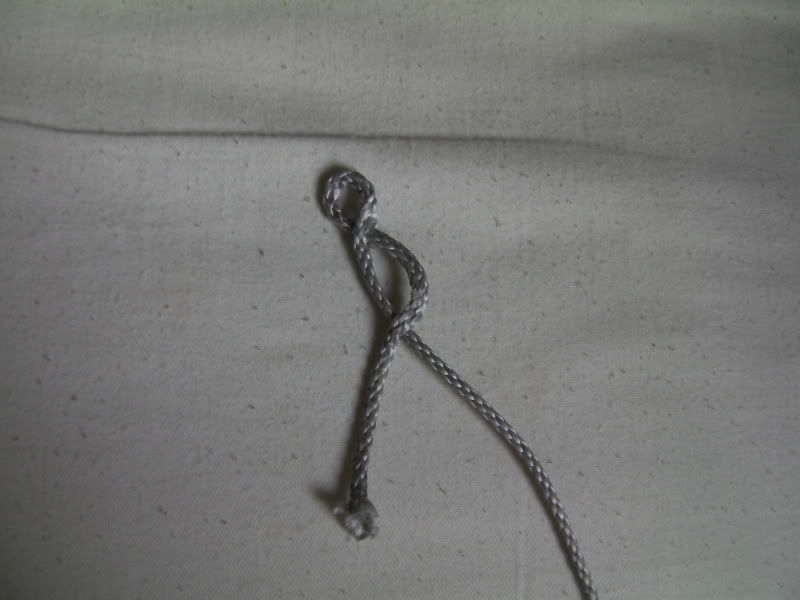
The Brummell is by far the best method IMHO cos there's no sewing with sharp needles and it locks the splice onto itself very thoroughly. And it's almost invisible ...
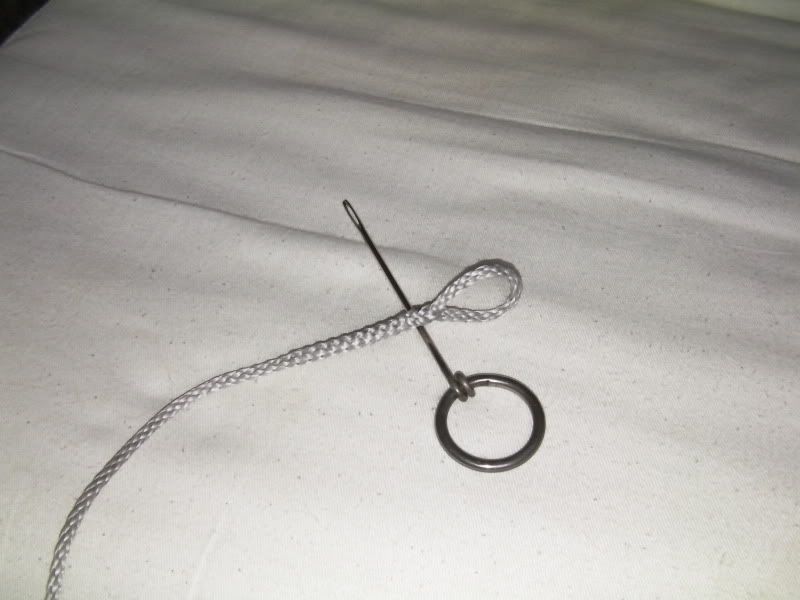
The tool is lying where the Brummell lock is ... you almost can't see it, just looks like a prefect smooth splice!
Size of the loop is the distance between A and B ...
What can I splice now? Ah ... here, kitty kitty - such a nice tail you got ...
It's basically a long needle with a large eye that I heated up with a blow-torch-in-a-can from the DIY store, a pair of pliers and my vice. Bent the needle around the ring, cut off the point - voila! Took about 10 minutes and works great!
Splicing is too easy!
A simple splice can be locked down by stitching it with a sewing machine, looking all very professional, as you can see at the FS Splicing Manual
... or with slightly less machinery as suggested by these guys.
Then there's the Zacher knot; needs no stitching with pesky waterproof thread but is a bit ugly. Found on the Storm Riders page - now via edt :)
My suggestion for the perfect locking splice without sewing it is the Brummell which I discovered at New England Ropes website.
Tips I learnt along the way ...
Flatten the end you're going to thread through the tool a little then cut at a sharp angle - aim to cut off about 10mm. Be very careful not to allow it to unravel too much past that 10mm.
When finishing the splice, cut the bitter end off just like above, then pull it into the spliced line - if you cut it square, it doesn't taper off smoothly.
Pull slowly and work the tool gently with your fingers.
Be careful not to allow the tool to pop out - you may lose the end of your splice up in there. Annoyance turned up to 11.
Stitching, done by hand, is very tough to make look tight, clean and professional. Especially when the thread is a different colour to the spliced line.
New England Ropes has this version of the Lock Stitch, which is a simple Brummell but does NOT lock the line very well and looks ugly.
Don't use a half-hitch on the Zacher, as suggested on that page - it ends up bulkier than an overhand knot.
The trick with the Brummell is that you have to invert one of the loops, actually poke it back through the other way. IIRC it's knot B on the webpage diagrams; use the tool again to encourage it back through. You have to go through the line that goes through the other ... sounds very Mobius strip but look at figure 11 up there and this pic ...
The Brummell is by far the best method IMHO cos there's no sewing with sharp needles and it locks the splice onto itself very thoroughly. And it's almost invisible ...
The tool is lying where the Brummell lock is ... you almost can't see it, just looks like a prefect smooth splice!
Size of the loop is the distance between A and B ...
What can I splice now? Ah ... here, kitty kitty - such a nice tail you got ...
Tuesday, June 29, 2010
DIY crossover bar
Too much time on my hands due to a lack of wind so I made this out of some spare parts ... consists of the Naish bar from my Zero4 bar and line set, Wipika depower line and trim straps on the brakes, Airush chicken loop, Harken 900kg pulleys, Mystic handlepass leash QR and some Q-power leaders that I went a bit mad splicing loops and knots into.
Now for some wind to try it out ... should be interesting cos the power lines on my Rebble are stretched to buggery and I don't want to risk my crisp Core or the insane Ace ...
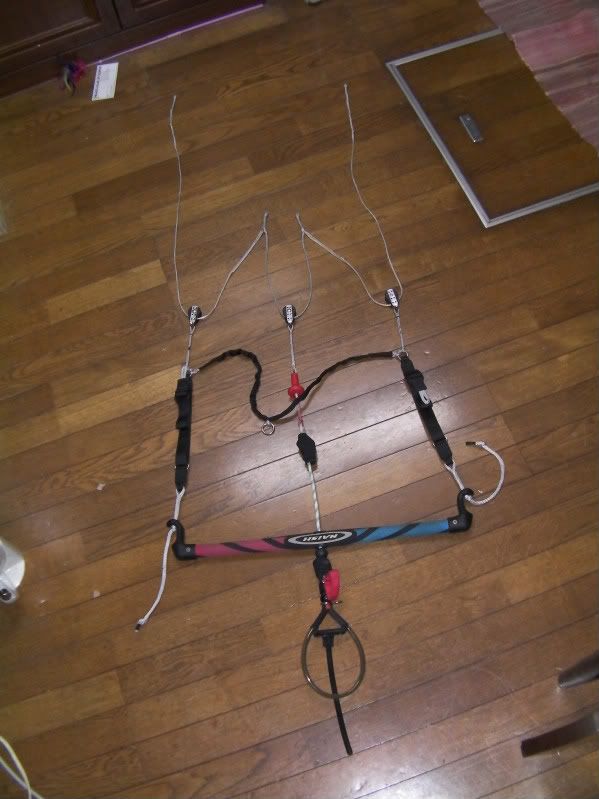
Now for some wind to try it out ... should be interesting cos the power lines on my Rebble are stretched to buggery and I don't want to risk my crisp Core or the insane Ace ...
Subscribe to:
Posts (Atom)