Stock bar uses a big brass washer (BBW) and then a jam nut on a nyloc nut to hold it all together. The problem with this is that it doesn't rotate very freely so although the bar is cleverly designed so that, after a rotation, you untwist the flying lines by spinning the bar then untwist the double depower rope when you sheet in. Unfortunately, the tension on the BBW et al is such that the depower rope gets chewed up - if you use it in the appropriate method. You can untwist by hand but that sucks.
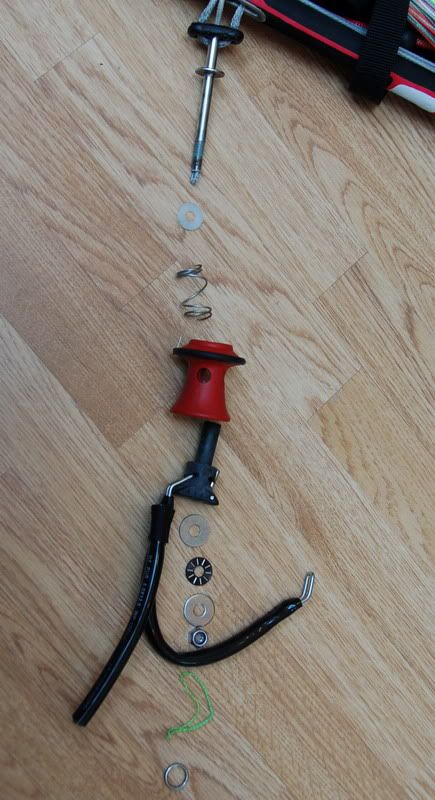
Here's an exploded view of Holden's needle bearing mod. It shows the setup nicely. The CL is connected to the black thing, the red hat and spring go onto the T-tube that has the double depower line looped around it.
Melting candle wax into the line (more on that at a later date, perhaps) helps keep it slippery; grease or other gunk down there is an option too but washes away and perversely attracts gunk and grit. IMHO the best option is simply to make the bar spin more freely.
Various teflon washer, ceramic or needle-bearings have been suggested but the greatest results have been obtained from using thrust bearings such as the MTBS-816 from here http://torquetrans.com/thrust-bearings/ss-metric-thrust-bearings.mgi ... be aware that they ONLY use UPS and shipping 1lbs (454g) of 8 sets to Japan was going to cost me $85 :D For $12, I got them to ship to a buddy in the US (thanks stetson!) and he sent them here ... for $2.59.
The problem - kinda - comes in putting it all together ... I went a bit mad with my digital calipers trying to work it all out.
Originally, the BBW + jam nut + nyloc nut = very close to 15mm. Breaking it down, the BBW is 0.75mm, jam nut is 6mm and the nyloc nut is 7.5mm.
The thrust-bearing stack (washer-bearing-washer) is 5mm tall. If you try to use the original stainless steel nyloc nut, you have to find a 1.5mm jam nut! Obviously no good.
You can't ditch the BBW cos it covers the pin that holds in the CL. And it's an odd diameter, something like 23mm so if you wish to drop a washer from the bearing stack and use a big stainless washer, then you - or rather, I - have to grind down a big stainless steel washer (BSSW) of 25mm diameter and bore a hole in the middle for the M8 thread of the bar doohickey. I wrecked a drill bit and over-heated and warped the washer I was experimenting on ... oops. So that bit is possible, at any rate. That leaves you with having to find only a 4mm jam nut ... get busy with a vise and file!
Solution 1 : grind and drill your own BSSW, use bearing-washer, file down a stainless nut to 4mm and use the OEM nyloc nut.
Less demanding of elbow grease is the option I tested the other day ... I bought the only little bag of nyloc nuts I could find in hardware stores in Japan and simply bolted it onto the stack above the BBW. The nyloc nut though is not (or does not look like) stainless steel, maybe zinc coated or something. It's also taller than the OEM nyloc nut at 9mm and the lip at the top where the nylon ring is, is taller than the OEM nyloc nut - if you wanted to file this down, you'd end up with a very slim hex part.
Solution 2 : keep the BBW, use the full thrust-bearing stack, add the M8 non-stainless nyloc nut ... and some thread-locking compound.
Those are the two options that most appeal to me - you could also use 2 short M8 stainless nuts or file them down a bit ...
Solution 3 : BSSW, 2/3 thrust-bearing stack, 2x filed down M8 nuts.
I'm of the opinion that so long as the thrust-bearing is doing its job and spinning freely the torque on the solitary nyloc nut is minimal and easily secures the rig ... and some thread-lock for paranoia! So I'm of the opinion that for ease of install and use, Solution 2 is the best option. Only time will tell if the components hold up to the water and work-out ...
Also, I prefer a nyloc nut on the end of the stack because, as you can almost make out in the pictures below, tightening the T-tube doohickey so the end of the thread stays in the nylon ring should stop it eating up the FLS line. One other thing to note too is at the other end of the CL and QR gubbins ... with the original setup, there's a bit of slack in there - the black CL holder has free-play on the T-tube. I think this is necessary because the welds on the stopper for the spring stand proud, and if it was all tightened up snug the black CL holder couldn't spin freely. It's also handy because it'll let the holder move around and should enable grit to be washed out of the bearing stack.
Someone put a thrust bearing at the end of the black tube but that's totally necessary I reckon as when the CL is under load, it's pulling the CL holder down and the kite is pulling the T-tube up - the only stress will be ... exactly where the thrust bearing is!
Here are the pics of what I've got. Crappy cell phone cos I can't find memory cards/chargers/batteries for the cameras at home that can do a proper macro.


After all that I bet you want to know how it all works? Well, it's bloody sweet! Spins perfectly, very smooth. Easy to untwist lines - too easy in fact! My first few uses, the bar spun so easily that my reactions hadn't accounted for the smoothness and I'd grabbed the bar backwards ... PLOP drove the kite into the water!
What pretty much happens is that the depower line simply untwists itself when you spin the bar to untwist the lines. An added bonus is that the bits rotate with the bar, so the CL stays square on your harness while the bar moves around ... neato! Well worth all the hassle involved of getting the bits ...!
UPDATE : 10th of April, 2012
Should've gotten to this sooner...
When I got back from NZ (and using the 21 in the salt water) I had with me some stainless steel nyloc nuts. I got around to replacing the zinc ones finally...
Actually, that's not true at all. I bought some SS nylocs in NZ but couldn't find them. So I went to the excruciating process of ordering some here in Japan... When they arrived, they were taller again than the zinc ones (???) at about 12mm.
Eventually - after replacing all the zinc ones with the new Japan-bought SS nuts - I found the ones I bought in NZ... in a ziploc bag of camera chargers and cables :-/ Murphy, you bugger.
So again, I replaced all the Japan-SS nuts with the NZ-SS nuts - which were shorter than all the other ones :o more like the original FSer ones.
Le sigh.
So the big news was that the zinc nut corroded like crap in the salt water. It looked furry and nasty and left a rust stain on the SS washer and green gunk on the brass one. The rust and gunk all wiped off easily though and the bearing itself was still super-sweet!
Despite having only one nut, it hasn't shifted at all... and I don't expect it to - so long as the bearing spins :)
No comments:
Post a Comment