TROPHÉE ST CLAIR / ZEEKO from Nguyen van Tâm on Vimeo.
Showing posts with label gear. Show all posts
Showing posts with label gear. Show all posts
Tuesday, April 26, 2011
Tuesday, February 15, 2011
Notes to self on DIY of the Megatron chicken loop for Flysurfer bars
With pictures and more or less information.
Update - ordered some Samson LashIt! twine from the US ... made from Dyneema and UV coated, 180 feet for $25 plus the same for shipping 0_o 1.75mm and 500lbs (230kg) breaking load - just what the doctor ordered! Hopefully :D and there should be much less grunting and swearing involved ...
Update on the update - LashIt! has arrived and looks excellent - adds very little to the thickness of the 5mm and oddly enough, looks exactly like what is used in the Flysurfer depower line ... will get into making a line tonight and promise to take pictures!
Supplies
• About 150cm of 5mm (3/16) Amsteel Blue SK-75, breaking load 2,500kg for the depower loop line
• and 100cm of 2.8 of Amsteel Blue SK-75, breaking load 750kg for the "core" ... probably the 2.2mm LashIt! would have been better than the 1.75mm but cest la vie and all that.
• 5/8mm ID/OD PU tubing - goes under the spinning handle and is easier than reusing the Ozone stuff ... it's just compressor line anyway
• Ozone Megatron chicken loop (duh) with the "Spinning Handle" for the 5th line safety
• Heat-shrink (or whipping line - synthetic)
• Needles and thread (synthetic too)
Tools
• Long-nosed pliers
• DIY pull fid - made from coated 20-gauge wire, put the end you want a loop in, in a drill and spun slowly till at least 1m long
• tie ball to push the tubing, about 20mm
0. Skip all this crap and use the Beal line. The easiest option by a country mile, but 1,200kg breaking load bothers me ...
1. Cut the PU tubing to fit inside the "Spinning Handle" - about 6cm long.
2. Taper the end of the 5mm Amsteel ...
• measure and mark at 70mm, 90mm and 110mm
• pull out 2 braids at each mark, starting at 110mm and working towards the tip
• should leave about 3-4 lines at the tip - if there's more, pull out a few more between the marks - keep the taper smooth!


3. Splice the 'core' into the 5mm Amsteel with the wire fid. Leave some sticking out on either end so you can pull it tight.


4. Start the lock stitch about 5mm from where you plan to cut. Slide the heat-shrink over the 5mm. Stitch out away from where you'll cut, then when you turn around to stitch back, cut and heat-shrink it then stitch back to the end and over the heat shrink.
5. Figure-8 knot in that end - that'll be going inside the CL body.


6. Remove the suicide-leash loop. Feed the tapered end of the 5mm up into the body of the CL, orientated so that the knot will be inside. Pull the 5mm though, smoothing it over the core. Pull hard to seat the Figure-8 stopper knot.
7. Feed the tapered end of the 5mm into the PU tube - twist and push!


8. If all goes well, the gods are smiling, the planets align and you hold your tongue just right - you should be able to pull out the 5mm and slide the PU over the taper, down the line and over the part with the core. From here on, use the ball-thingy to push the PU tube down to the CL body. Smooth out the 5mm over the core and seat it hard against the body of the CL.
9. Fit the spinning handle onto the PU tubing ... using a smaller core makes life easier - zero strain with the 1.75mm LashIt!. Leave the screws just snugged-up for now.
10. Make sure the 5mm is smooth and taught over the core; measure 40cm from the spinning handle body (40cm is standard for FS kites - J. suggests 40-45cm; my SA2.5 is 48cm) and then figure out how much you need for a Bowline ...
11. Cut the line off square and secure the tip with heat-shrink or whipping - and lock stitch ... I had planned to cut 1.1m of 5mm and end up with 1m of depower line but somehow it ended up as a finished length of 70cm which is about perfect - you can easily (kinda!) tie a bowline at the trim strap and still have 45cm of depower. That's before it's put under load and tightens up ...


12. Feed the depower line through the bar, fit the gust absorber and feed/pull through the trim strap - make sure there's some 8mm OD PU tubing in there!
13. Bowline at the trim strap. Get it tight! It'll all snug up on the next flight, so be prepared to adjust front leader lines or mixer 0_o'
14. Tidy it all up; refit the suicide-leash loop, tighten the screws on the spinning handle (make sure it and the PU tubing is seated hard against the CL body), cover the gust absorber.

15. Go fly! Check to stretch etc and SailKote the line!
Update - ordered some Samson LashIt! twine from the US ... made from Dyneema and UV coated, 180 feet for $25 plus the same for shipping 0_o 1.75mm and 500lbs (230kg) breaking load - just what the doctor ordered! Hopefully :D and there should be much less grunting and swearing involved ...
Update on the update - LashIt! has arrived and looks excellent - adds very little to the thickness of the 5mm and oddly enough, looks exactly like what is used in the Flysurfer depower line ... will get into making a line tonight and promise to take pictures!
Supplies
• About 150cm of 5mm (3/16) Amsteel Blue SK-75, breaking load 2,500kg for the depower loop line
• and 100cm of 2.8 of Amsteel Blue SK-75, breaking load 750kg for the "core" ... probably the 2.2mm LashIt! would have been better than the 1.75mm but cest la vie and all that.
• 5/8mm ID/OD PU tubing - goes under the spinning handle and is easier than reusing the Ozone stuff ... it's just compressor line anyway
• Ozone Megatron chicken loop (duh) with the "Spinning Handle" for the 5th line safety
• Heat-shrink (or whipping line - synthetic)
• Needles and thread (synthetic too)
Tools
• Long-nosed pliers
• DIY pull fid - made from coated 20-gauge wire, put the end you want a loop in, in a drill and spun slowly till at least 1m long
• tie ball to push the tubing, about 20mm
0. Skip all this crap and use the Beal line. The easiest option by a country mile, but 1,200kg breaking load bothers me ...
1. Cut the PU tubing to fit inside the "Spinning Handle" - about 6cm long.
2. Taper the end of the 5mm Amsteel ...
• measure and mark at 70mm, 90mm and 110mm
• pull out 2 braids at each mark, starting at 110mm and working towards the tip
• should leave about 3-4 lines at the tip - if there's more, pull out a few more between the marks - keep the taper smooth!
3. Splice the 'core' into the 5mm Amsteel with the wire fid. Leave some sticking out on either end so you can pull it tight.
4. Start the lock stitch about 5mm from where you plan to cut. Slide the heat-shrink over the 5mm. Stitch out away from where you'll cut, then when you turn around to stitch back, cut and heat-shrink it then stitch back to the end and over the heat shrink.
5. Figure-8 knot in that end - that'll be going inside the CL body.
6. Remove the suicide-leash loop. Feed the tapered end of the 5mm up into the body of the CL, orientated so that the knot will be inside. Pull the 5mm though, smoothing it over the core. Pull hard to seat the Figure-8 stopper knot.
7. Feed the tapered end of the 5mm into the PU tube - twist and push!
8. If all goes well, the gods are smiling, the planets align and you hold your tongue just right - you should be able to pull out the 5mm and slide the PU over the taper, down the line and over the part with the core. From here on, use the ball-thingy to push the PU tube down to the CL body. Smooth out the 5mm over the core and seat it hard against the body of the CL.
9. Fit the spinning handle onto the PU tubing ... using a smaller core makes life easier - zero strain with the 1.75mm LashIt!. Leave the screws just snugged-up for now.
10. Make sure the 5mm is smooth and taught over the core; measure 40cm from the spinning handle body (40cm is standard for FS kites - J. suggests 40-45cm; my SA2.5 is 48cm) and then figure out how much you need for a Bowline ...
11. Cut the line off square and secure the tip with heat-shrink or whipping - and lock stitch ... I had planned to cut 1.1m of 5mm and end up with 1m of depower line but somehow it ended up as a finished length of 70cm which is about perfect - you can easily (kinda!) tie a bowline at the trim strap and still have 45cm of depower. That's before it's put under load and tightens up ...
12. Feed the depower line through the bar, fit the gust absorber and feed/pull through the trim strap - make sure there's some 8mm OD PU tubing in there!
13. Bowline at the trim strap. Get it tight! It'll all snug up on the next flight, so be prepared to adjust front leader lines or mixer 0_o'
14. Tidy it all up; refit the suicide-leash loop, tighten the screws on the spinning handle (make sure it and the PU tubing is seated hard against the CL body), cover the gust absorber.
15. Go fly! Check to stretch etc and SailKote the line!
Saturday, November 13, 2010
Yo turbo'd my Core man!
No work this weekend so we trotted down to Hamamatsu. Forecast was ass but I took a full load of kite gear and lobbed my Core 6.7 and new Ozone Turbo bar in the boot too ...
Arrived at Maisaka Beach about 4pm with a touch of wind, so I unpacked the Core and Ozone and had a play while the wife went walkies.
There was hardly any wind so set up was no problem - walked the lines out of the bag, had a quick fly so I remembered what flying on handles was like (it's been a few months!) then landed and swapped to the Turbo bar ...
Compared to my homemade thing, it's much smaller and nicer :D the amount of "depower" throw is much less, as is the trim and the leader lines are much shorter. Something to work on for the rest DIY version ...
Launched and had some play time ...
Works real nice! Strangely enough :D
Brake input is enough for turning but a bit limited for actually stopping the kite but you can trim in more.
Kite turns lovely - tight enough to turn almost on a wingtip yet not lose too much speed - and is super-stable, easily recoverable in the light winds when it luffed - quick tug on the center lines.
Tested the various safety releases ... red hat above the bar is the best without a doubt, but I'd need to train my instincts for that one. Chicken loop release with a leash to the landing handle is probably easier to do but the leash doesn't spin with the bar and that lead to tangles.
Also played unhooked and the bar could be trimmed to fly nicely like that but DAMN the whole point is to take the strain through the harness!
Compared to my Version 1.0 DIY crossober bar, I had too much depower and the leaders were too long, but they handled pretty much the same ... although being able to stall the kite with the bar on my version was handy. Probably unnecessary too :)
So I think in the end, the landboarders will love it but the buggy guys will probably stick with handles. There's a little loss of fine control that you have with handles but you gain more consistent power and a much longer ride!
Saturday, September 25, 2010
Hopeless in Hamamatsu
Not enough room in the car to take a board but forecast for no wind anyway so that was fine ...
I did, however, take my new Navigator bar that arrived from Ricardo of ripsessionkites.com like, 10 minutes before we were due to leave - perfect timing! - and also took the Synergy 19 & 12. Just in case.
Friday was crap. Saturday had some wind though ... and MASSIVE waves that had been whipped up by the passing typhoon - thank god I didn't have a board or I might have tried to get out there :D unpacked the 19 and set up with the Navigator bar ...
Coming from weeks of LEI flying, at first I found the bar pressure heavy and the turning slow ... until I got back into Arc Mode - a little sheeting in and pulling the bar will whip the kite around nicely. Get some speed into it to keep it lively. Don't sheet in too far for too long ... ah yes, know I remember! Soon had the Syn 19 whipping around nicely! Some great scuds and jumps but really, the wind was still too light ... maybe 12 knots at most. Good to test the light wind annoying habits of the arc on the Nav bar though ;) spent about 2 hours noodling around.
Landing the kite by trimming for power, flying slow as I could to the edge of the window and stalling the kite, then letting it power up a tiny bit and bouncing back until it was directly downwind, the unhooked and dropped the bar ... perfect flagged landing, no twisting!
To review the Navigator ...
• Well designed bar; nice attention to little details, like the recessing the line tidy bungy loops & being able to change the bar size.
• Safety through the center of the chicken loop - awesome!
• The Ozone Megatron-esque safety - awesome! Although looking at the leash that has the Zero7 red hat, I'm wondering if the Zero7 bars couldn't be modded like that ...
• Double depower line, spinning head and cam cleat trim - very nice, works well and should be bullet proof, although I'm a little worried about the result of long term stress on the spinning heads erm spinning parts - we'll see. A mile of depower.
• Bar foam felt weird - too smooth ... I like the rougher Zero7 foam better ... and the foam around the depower line's metal runner through the bar seems poorly trimmed - like a bit of an afterthought. I'm betting it'll get mangled pretty soon and be a moot point though. I preferred the bolder colours of the Zero7 too ... the curved line through the foam is not just a design element; it's harder than the other foam and gives you a good feeling for where you park your hands. Meh, I know what I mean ;)
• Power lines have the V some way up the lines, with the front line safety kind of like the Zero4 ... seems to work nice - the kite flattened out a lot less in moments of low airspeed and held a stable shape much better in turns etc. Perhaps a bit more responsive to turning inputs when not moving compared with the Zero7. Kite can still invert though, when I intentionally flew it fast past the edge of the window at about 11 o'clock (I was trying to get the kite as out of shape as possible to see how much of a difference the bar made) ... the kite sank down and inverted to land LE down and I depowered then walked toward the kite to flip it over - no problem. Also, just once, the kite went to the RHS of the window and stalled and the safety line fell through the metal ring and the kite REALLY started to get out of shape ... as it was out over the breakers (beach was narrow today) I jerked the center line to recover it. So I think it's a good thing.
• Line extensions ... hmm, not sure. By that I mean, not sure if I'd notice a difference :D
• Adjustable stopper is pretty good but I'm wondering how much utility it'll actually provide ...
• Didn't like : heat shrink = LOL ... nuff said!
• Didn't like : the big ugly knot that's hidden under the neoprene booty that covers whatever is going on behind the cam cleat ... nasty! Spoils the smooth lines :)
• Didn't like : like I said, the wishy-washy colours ... FIRE TRUCK red and BOTTOMLESS PIT black please!
Great bar, looking forward to piling the hours on it ... again, massive thanks to Ricardo at ripsessionkites.com (yes I'm pimping!) for the excellent service and taking care of me!
PS. Wife called the courier and they just delivered my Speed 2.5 19 Silver Arrow! Now to unwrap ... OMG it's Christmas!
Saturday, August 7, 2010
More DIY - crossover bar KB grows
More knowledge for my brains to soak up ... went to the river to meddle with my crossover bar and learned some stuff. Poor Rebble had a hard time though!
What you depower at the bar is like 2x what the rear lines move cos of the pulleys ... so basically, you can easily cover the full throw of even long handles (sheeted out to sheeted in ie. brakes full off to full on) with about 440mm of depower. You probably don't need all that though as you probably don't want to be able to totally stall the kite on the bar unless you trim for it eg. landing. IMHO pulling the bar all the way in should just tweak the brakes so you get the boost ...
The center pulley line needs at least 1/2 the length of the bar (aka the amount used in a turn) per side, below the knots. So for a 60cm bar the total length for that line should be like 70cm minimum, plus knots
Small knots at the ends of the leaders don't get tangled around the lines in loops.
Trim on each of the rear lines is a nice idea but fiddly in practice. Above the bar trim means that safety has to go but it'll be cleaner ...
A nice & pretty self-landing line creates too much drag IMO although using it for a chicken loop safety works nice, but don't trust the Wipika leash. And the Airush red handle pulled right off ...!
Probably - setting the rear lines so the pulley is lower than center will increase the amount of travel up and down that line but be less likey to use it all up. I know what I mean, don't worry :)
... I need more leader line!
Wednesday, July 21, 2010
DIY crossover bar - first test
First day of the hols and I'm already bored, little to no wind and it's southerly so it's no use to me anyway ... may as well go annoy the groundskeepers at the Notogawa park.
Hot as hell, road sign said 37°C but at least it's not as humid as it was last week.
Arrive at the park with my Rebble and Ace and tramp down to the river bed to enjoy the nice flat cool grassed area ... /rant bloody old people are taking over the WHOLE public park with their stupid gate ball ground golf croquette game - there's bloody metal spiky flags all over the river bed now! Sigh ... I think one day they might come and find them all at the bottom of the river ...
So back to the soccer pitch (hard packed dirt) to set up with the Rebble first. Quick flight with the handles - phew only enough wind to keep it in the air! Switch to the bar ... whoa that works sweet! The Rebble is my first kite and the power lines are about a foot longer than the brake lines - the bard works perfect without any trim so I guess for my newer kites I'll have to meddle ... play with the Rebble for a bit, end up walking backwards across the field but am enjoying the speed and ease of 'depowering' the kite and how well it turns! Reach the end of the pitch, test the safety - boing! - no problems so pack up the Rebble.
Out comes the Ace. I removed the pulleys from the pulley handles for the bar ... the pulley handles worked ok but without a back-strap, it was (and still is!) impossible to apply brakes on this monster! The wind has shifted to northerly - quick flight with the handles ... damn what a beast! Switch to the bar and pop it up ... nice! Needs a bit of trim on the brake lines - I guess the power line connector is too short like Jovver said - sorted that out and now she flies good! Power is much easier to handle with the bar and through the harness (duh!) and it turns a little quicker.
Reverse relaunch is a little trickier than with handles and you lose a little finesse, but I think on the whole it's a great bit o' kit! Now I'm going to try to make something like the PKD bar :D
Tuesday, June 29, 2010
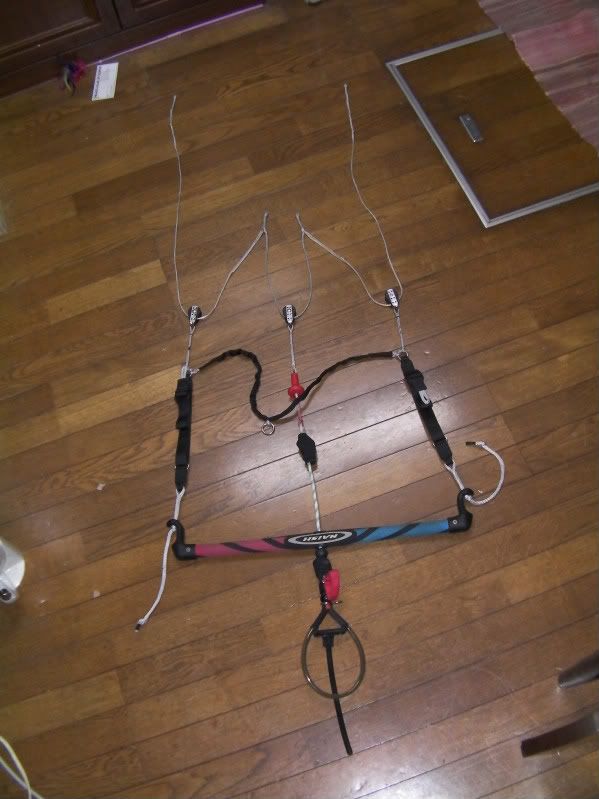
DIY crossover bar
Too much time on my hands due to a lack of wind so I made this out of some spare parts ... consists of the Naish bar from my Zero4 bar and line set, Wipika depower line and trim straps on the brakes, Airush chicken loop, Harken 900kg pulleys, Mystic handlepass leash QR and some Q-power leaders that I went a bit mad splicing loops and knots into.
Now for some wind to try it out ... should be interesting cos the power lines on my Rebble are stretched to buggery and I don't want to risk my crisp Core or the insane Ace ...

Now for some wind to try it out ... should be interesting cos the power lines on my Rebble are stretched to buggery and I don't want to risk my crisp Core or the insane Ace ...
Sunday, March 14, 2010
Zeeko
New kite company's promo video for their 14m light wind kite, I guess. The foilboard at 2:29 is the interesting bit. Looks like fun :)
Notus 14LW E.R.A from zeeko on Vimeo.
Subscribe to:
Comments (Atom)